Saturday, November 26, 2011

Mini Pies!

Thanksgiving has come again and that means it's time for PIE!! I saw these mini pies on Pinterest and couldn't resist the opportunity to try them myself. My husband talked me into making a full 2 dozen each of apple and pumpkin. The pies were a big hit with the family, and making so many meant that we were able to eat a few beforehand without causing a noticeable dent in the pie supplies.

Mini Pumpkin Pies
Ingredients:
Filling for two 9" pies
2 boxes refrigerated pie crusts (4 crusts)
Directions:
1. Cut 24 circles from the pie crusts using a 4" round biscuit cutter or small bowl.
2. Place dough circles into muffin pans.
3. Pour filling into cups to the top.
4. Bake at 425* F for 15 minutes, tuen turn heat down to 350*F and bake 25-30 minutes.
5. Let cool on wire rack 1-2 hours until set.

I decided to make pumpkin pies first because they're easier and I could work on preparing the apples for the apple pies while the pumpkin pies were baking. 

I am a big fan of Pillsbury refrigerated pie crusts. I bake pies with them all the time and get compliments on my crusts--I confess that I don't tell people I didn't make them from scratch. ;) Hey, if they can't tell the difference, I'm not going to tell! 
 My setup--muffin tins, 4" biscuit cutter, pie roller, waxed paper to roll it out on.

 Cut out 5 circles from the dough--they fit without overlapping.

 See? 5 circles. Then roll your remaining dough into a ball and roll it out again to cut out a 6th circle. I put the remainders into a Ziploc baggie to use for the lattice tops on the mini apple pies.
 Start putting your dough circles into the muffin tins. They weren't fitting too well to begin with.
 See how they're kind of all wrinkly on the edges? Not so pretty.
 Then I had the idea to cut out a little wedge, Pacman-style, to make the circles fit better.
 Much better! I just overlapped the cut edges and pressed them together.
 You can see the difference between the Pacman dough and the full circles.
 The difference is even more obvious when you look at it from above. So, cut out the wedges for better fitting dough!
 Now for the filling. I again took the easy way out and got the pre-made canned pie filling. It already has the spices mixed in, so you just add a 5 oz. can of evaporated milk and 2 eggs to each can of pie filling.
  I used my largest Pampered Chef scoop to fill the pies. I probably could have added a little more filling, but I didn't want to risk them bubbling over and getting stuck in the muffin tins. I think it's a matter of trial-and-error--next time I'll probably get it just right!
 Getting filled...
 And just out of the oven.  I may have left them in just a couple of minutes too long--the crusts were a little darker than I like, but not at all burnt. Still tasty, though!
 You can see on the edge of this one where the filling bubbled over a little and made the crust stick.
 Use a really sharp, thin knife (I used one of my PC paring knives) to loosen the edges where the pies are sticking. You don't want to bust up the crust, so a thin blade is best.

Use a spoon to help you lift the pies out of the muffin tins and place on the cooling racks. Look at those yummy pies! 


Mini Apple Pies
Ingredients:
8 cups apples, diced into 1/2 inch cubes
12 Tbsp flour
1 1/2 cups sugar
4 heaping tsp cinnamon
1/4-1/2 tsp nutmeg
4 Tbsp butter, cut into 24 equal portions
2 boxes refrigerated pie crust (4 crusts)
Directions:
1. Mix together flour, sugar, cinnamon, and nutmeg. Toss over diced apples and mix to coat evenly.
2. Cut out 24 circles of dough and line your muffin cups, saving all scraps.
3. Fill each muffin cup with apple mixture and place one piece of butter on top of apples.
4. Roll out remaining pie crust scraps and cut 1/2 inch wide strips to form lattice tops. 3 strips in each direction should cover it. Tuck in the ends so they don't overhang.
5. Bake pies at 400*F for 18-22 minutes.
 I mixed up all my dry ingredients as soon as the pumpkin pies went into the oven.
 I used an apple slicer on all my apples first. I used 3 Granny Smith apples and 3 Honeycrisp apples.
 My sweet husband helped me to peel the apples with a paring knife, then we chopped them into tiny pieces.
 All chopped up! There's some variety in the size of pieces, but I think that works well to fill the pies.
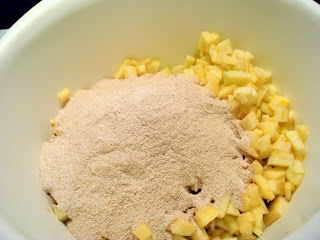
 Add in the dry ingredients and mix it up well. I dug in with my hands to make sure there were no dry bits hiding at the bottom.
 Getting started on the lattice tops--you can see the butter pieces, too. I forgot these the first time I made the pies and I do think it helps to keep the insides nice and juicy. We used a decorative cutter to slice our lattice pieces.
 So pretty!
 My sweet husband helped with the lattices.
 Look at him go!
 One whole pan covered in the lattices.
 We ran out of dough and the last two got skimped on... those were our samples after the pies came out of the oven!
 Look at them all golden brown and delicious!
 A few of them were a little TOO juicy and bubbled over a bit, oops! Just use the paring knife again to loosen the pies where they got stuck.
 And here they are cooling down. Notice there are a couple missing? They sure were tasty! 


And there you have it! 2 different kinds of miniature pies for your eating pleasure. :)

Monday, November 14, 2011

Third Time's the Charm

I've been trying to find a good meatloaf recipe for a while now. My husband likes it, although I've never been a big fan, and I try to make things he'll enjoy. I've tried twice before and each time the meatloaf turned out way too moist and soggy.

Someone I know finally mentioned that they also prefer a more dry meatloaf and that they use the recipe on the back of the Lipton Onion Soup Mix package. So I decided to give it a try, with a couple of alterations.

The recipe called for 2 eggs, which I reduced to one. I used Panko bread crumbs instead of standard bread crumbs, and threw in a couple of handfuls of oatmeal for good measure. The recipe instructions on the soup mix say to form it into a loaf but to put it in a 9 x 13" pan, not a loaf pan. This allowed the grease to cook out of the meat and didn't leave the loaf boiling in its own juices. I took the meatloaf out of the oven when it was about halfway done and poured off the grease. When it was done cooking I poured off the juices again before letting it rest for a few moments. Next time I might try getting ground beef with a lower fat content. We've been buying the big 5 lb rolls of ground beef lately because it's cheapest, but it can be fatty.

My husband declared it a success and ate three pieces, and I even ate a piece and a half myself (in my previous attempts I didn't even manage to finish one.) So it looks like the third time was the charm when it comes to meatloaf!

Meatloaf with Onion Soup Mix
Ingredients:
2 lbs ground beef
1 envelope Lipton Onion Soup mix (there are 2 in a box)
3/4 cup Panko bread crumbs
1/2 cup oats 
3/4 cup water
1/3 cup ketchup
1 egg

Directions:
1. Preheat oven to 350 degrees F. 
2. In a large bowl, combine all ingredients.
3. Shape into a loaf and place in the middle of a 9 x 13 glass baking dish. 
4. Bake 1 hour. Remove from oven after 30 minutes and drain off liquid. When done, drain liquid again and let rest 10 minutes before serving.  


Friday, November 11, 2011

New Name

I always hate the point in a registration process where you are asking to come up with a screen name/ user name/ blog name. Talk about pressure! Finding something clever but not too cutesy, accurate but not boring, all at the drop of a hat? Yikes! It's probably a good thing that babies come with such a long incubation period--plenty of time to work out the name thing (whenever we get to that point, which will probably be a few years down the road.)

Anyway, I chose the name of this blog-- "Shh, Quiet Times"-- in one of those pressure-filled moments but haven't really loved it. This blog isn't really about quiet times, although I am a fairly quiet person. SHH comes from my married initials, so I was trying to play on that, but not too successfully in my opinion. So, I did some brainstorming in the shower this morning and decided on something a little different---Sarah Hope at Home. It still has the SHH, but it's a little more accurate in terms of embodying what this blog is about--the things I do at home, like cooking, etc.

Fortunately I'm not far enough into this blogging journey to really have to worry about having a huge following, so for the few people who click on my Facebook links when I make new posts, I hope this isn't too confusing for you.

**************

In other news--it's Veterans Day. I've been seeing lots of posts on Facebook, plus I get the day off. Both of my grandfathers were in the military--on my dad's side, my grandfather was a marine, and on my mom's side, my grandfather was in the Air Force. They are both gone now, but I do honor their memory and the sacrifices they and all the other members of the armed forces have made and are making for us each and every day.

I'm trying to decide what to do with my day off--it's always so tricky because you want it to be something awesome and meaningful because how often to you get a day to do whatever you want during the week? But in reality I am thinking of running boring errands like going to the grocery store and getting gas. Not exactly the big plans people usually make for 3 day weekends, but since my husband does have to work today, and is working at his part time job this evening and all day tomorrow, that kind of puts a crimp in my style.

Although it might be kind of sacrilegious--after all, Thanksgiving is still two weeks away--I might just go Christmas shopping. We need a new tree topper and some stockings and I know from experience that if I wait too long the options will be severely limited! I promise not to decorate before Thanksgiving, though. Hopefully that will keep me from being in too much trouble with whoever monitors these things.

Wednesday, November 9, 2011

Burn, baby, burn

Over the weekend we had some friends over to celebrate a birthday. My husband requested that I make his family's lasagna, which I have done before and it is quite tasty. I decided to get creative, though, and make a recipe I've seen floating around on Pinterest for "Olive Garden Breadsticks".


Just look at that picture! How could I NOT attempt to make them?

..."attempt" being the operative word. They burned. Blacker than hockey pucks on the bottom. I THINK the problem was partly because (silly me) I followed the instructions and sprayed the baking sheets--if I try these again I think I will try cooking them on parchment paper instead. Also, one of my baking sheets was too long to share a rack with the other sheet, so I had to put one on the bottom oven rack--that's the one that burned worst. They were smoking before the oven even got up to the 400 degrees you're supposed to cook the breadsticks at for 12 minutes, so something seriously went awry.

Fortunately, my husband apparently has no faith in my bread making skills suggested that we get a "backup" loaf of garlic bread from the grocery store, "just in case." So--lasagna with garlic bread!

The lasagna was a big hit--the 5 of us ate an entire 9x13" pan (approx. 3 pieces each.)

No photos, but here's the recipe.

Steven's Family Lasagna
Ingredients:
1 lb hamburger
2 cans (6 oz.) tomato paste
4 cans (6 oz.) water
1 package spaghetti sauce mix (the recipe says American Beauty brand, but our store doesn't have that brand--I get the "thick and zesty" sauce mix instead of the "italian style" mix which looks too runny.)
Lasagna noodles (1 box, plus a few extra noodles to be safe)
24 oz. container small curd cottage cheese
1 lb grated mozzarella cheese
1 egg
1 Tbsp chopped parsley (I never remember to add this)
and we always need:
1 jar spaghetti sauce (Prego prego prego prego prego is the best!)

Directions:
1. Preheat oven to 350 degrees F. Brown hamburger meat in a large skillet; drain. Return to pan and mix in tomato paste, water, and sauce mix. Cover and simmer on med-low heat for 15 minutes.
2. Boil lasagna noodles 12-15 minutes. (If you add a little vegetable oil to the water it's supposed to help the noodles not stick together as bad.)
3. Drain cottage cheese (if there's liquid TO drain--mine never seems to need it). Mix in mozzarella cheese, egg, and parsley. 
5. Lightly grease a large (9 x 13") baking dish.
6. Layer ingredients in pan in this order: Meat, noodles, cheese, meat, noodles, cheese, ending with meat. Except we always run out of the meat sauce before the last layer of noodles/cheese, so instead of putting meat sauce on top we put the jarred spaghetti sauce on top. Make sure all the noodles are fully covered (or you'll have tough noodles!)
7. Bake at 350 degrees F for 30 minutes.
 8. While it's baking, munch on any leftover lasagna noodles. Mmm, noodles! (Ok, this isn't really a step. But we always do it!)

Pretty easy, as far as lasagna goes, and obviously tasty enough that our friends devoured it! I'm pretty sure I'll be making this for my husband's birthday every single year for at least several years to come.


Saturday, November 5, 2011

Porkin'!

Every time I cook pork, I think of this story my mom tells. When they were little, someone asked her brother what his favorite kind of beans was. He promptly replied "porkin'!" (aka pork and beans.) Hehehe. It makes me smile every time.

I've made this recipe once before and decided to give it another go. Last time I cut the pork in little tiny medallions, but this time I went for bigger slices. My husband liked it last time, but he LOVED it this time, so I guess bigger is better!

Here's where I got the recipe originally.

Maple Rosemary Glazed Pork
Ingredients:
1/3 cup pure maple syrup
1 tsp dried rosemary (or 2 tsp fresh)
4 thick sliced pork chops or pork loin
3/4 tsp kosher salt
1/4 tsp ground black pepper
2 tsp vegetable oil

Directions:
1. Preheat oven to 325 degrees F. Season both sides of each pork chop/pork loin slice with the salt and pepper.
2. Heat the oil in a heavy bottom skillet over med-high heat. When the oil starts to smoke, add pork to the skillet. Sear approx 3 minutes on each side until well browned. Transfer to a baking sheet (I cover mine in parchment paper) and set aside.
3. Drain the fat off of the skillet, add the syrup and rosemary. Cook about 30 seconds to 1 minute, until fragrant. Put the pork back into the skillet to coat with the glaze (I make sure both sides are coated well), then put back on the baking sheet.
4. Place pork in the preheated oven and cook 15-20 minutes. Allow to rest a few minutes before serving.


Tuesday, November 1, 2011

Na na no no mo

Well, I THOUGHT NaBloWriMo coincided with NaNoWriMo, but apparently Blo is in October and Wri is in November. Shucks! Although, there's nothing to say I'm not allowed to do a personal challenge of blogging every day this month, right?

So--November 1! It was 77ish degrees today, and it's supposed to be 50 tomorrow and possibly snow tomorrow night. That's Kansas for ya, I guess.

It was great fall weather over the weekend so I did wind up making that beef stew--yummy! It turned out really well. I added some frozen corn as well as the frozen peas, because it seemed like a fitting addition. I think next time I won't cut the beef into QUITE so bite-sized chunks--after it had cooked for several hours, a lot of the pieces kind of disintegrated so there were tiny threads of beef in the stew and not many chunks. I don't want the honking big chew-for-5-minutes-before-swallowing chunks of beef in my stew, but I think I can find a happy medium somewhere in there. Regardless, the stew was awesome and I will definitely keep that recipe in my file!

The other lesson learned the hard way was that the cast iron lid to the dutch oven does NOT cool down instantly after removing from the 250 degree oven it's been sitting in for the last several hours... I picked it up with my bare hand and kind of scorched my fingertips. I was at the sink and only picked it up a couple of inches, but I did chip the enamel on the lid and on the edge of the pot when I dropped the lid. Oops. :( Lesson learned... and I've had more painful burns before, so it could have been much worse.

I tried a recipe last night for Granny Smith Apple Crisp, and oh my... it is so delicious! I found this recipe via Foodgawker and it tastes just as good as it looked. The oats in the topping make it nutty and sweet and so amazing. I could rave for hours about this stuff. I could eat it for breakfast, lunch, and dinner (and might have... shh!)

Now... because I have really missed sharing my crappy cell phone pictures... I'm going to share a recipe of my own instead of just raving about everyone else's!

Taco Ring

I can't really claim this recipe as "my own." My husband actually brought this recipe into our marriage (along with more questionable choices like "cheeseburger soup" and the obviously tasty recipe for his mom's lasagna.) I was pretty skeptical at first, but after he made it for me I was sold. It's one of our easy go-to meals when we don't feel like exerting much effort, or on the occasion when I'd rather let my husband cook something than get in the kitchen myself.

Ingredients:
2 cans refrigerated crescent rolls
1 pound ground beef/hamburger
1 pkg taco seasoning
shredded cheese (we like the pre-bagged Mexican cheese for this)
Any other taco toppings you like

Process:
1. Preheat oven according to directions on the crescent roll package.
2. Brown hamburger and drain; add taco seasoning and a minimal amount of water (just enough to get the seasoning distributed, but not enough to leave liquid in the pan.)
3. Add cheese to hamburger and mix until melted. You can add as much or little as you like here--you want it to be enough that the hamburger starts sticking together when you spoon it up and doesn't crumble apart all over the place.
4. Arrange the crescent roll triangles on a round baking sheet/pizza pan/pizza stone. Arrange so the bases of the triangles overlap slightly and form a solid ring toward the center of the sheet, and the points of the triangles point out and hang off the edge. You want a good 1-2" ring of solid crescent roll dough at the center, with a hole in the middle. I googled and found this image to illustrate:


We usually wind up with 2 crescent rolls left over for some reason--we just roll them up like normal crescent rolls and stick them off to the side of the pan when cooking.
5. Spoon the taco meat/cheese mixture onto the solid ring of dough. Try to keep it even and not drop any into the middle. This would be a good time to add other toppings (tomatoes, whatever) if you want, too. If there is a lot of liquid in your pan, try to avoid transferring it to the dough--it'll make your dough too wet and it won't cook and crisp properly on the bottom.
6. Once all the meat is on the dough, begin folding the tips of the triangles back toward the center, arching over the meat. There will be stripes that the dough doesn't cover--that's okay. Tuck the points in along the dough at the center so they stay wrapped over the meat.
7. Bake for the time indicated on the crescent roll package--until golden brown and crispy, top and bottom. Nobody likes soggy bottoms.
8. Remove and slice as big or little as you want.

Here's the result! You can see on the top how the triangles were folded back over, and how they didn't totally cover the meat.

I have seen variations on this recipe in a few places--you could make a pizza ring with sauce and toppings if you wanted. I have yet to try them, but I'm sure they would be equally tasty.