Mini Pumpkin Pies
Ingredients:
Filling for two 9" pies
2 boxes refrigerated pie crusts (4 crusts)
Directions:
1. Cut 24 circles from the pie crusts using a 4" round biscuit cutter or small bowl.
2. Place dough circles into muffin pans.
3. Pour filling into cups to the top.
4. Bake at 425* F for 15 minutes, tuen turn heat down to 350*F and bake 25-30 minutes.
5. Let cool on wire rack 1-2 hours until set.
I decided to make pumpkin pies first because they're easier and I could work on preparing the apples for the apple pies while the pumpkin pies were baking.
I am a big fan of Pillsbury refrigerated pie crusts. I bake pies with them all the time and get compliments on my crusts--I confess that I don't tell people I didn't make them from scratch. ;) Hey, if they can't tell the difference, I'm not going to tell!
My setup--muffin tins, 4" biscuit cutter, pie roller, waxed paper to roll it out on.
Cut out 5 circles from the dough--they fit without overlapping.
See? 5 circles. Then roll your remaining dough into a ball and roll it out again to cut out a 6th circle. I put the remainders into a Ziploc baggie to use for the lattice tops on the mini apple pies.
Start putting your dough circles into the muffin tins. They weren't fitting too well to begin with.
See how they're kind of all wrinkly on the edges? Not so pretty.
Then I had the idea to cut out a little wedge, Pacman-style, to make the circles fit better.
Much better! I just overlapped the cut edges and pressed them together.
You can see the difference between the Pacman dough and the full circles.
The difference is even more obvious when you look at it from above. So, cut out the wedges for better fitting dough!
Now for the filling. I again took the easy way out and got the pre-made canned pie filling. It already has the spices mixed in, so you just add a 5 oz. can of evaporated milk and 2 eggs to each can of pie filling.
I used my largest Pampered Chef scoop to fill the pies. I probably could have added a little more filling, but I didn't want to risk them bubbling over and getting stuck in the muffin tins. I think it's a matter of trial-and-error--next time I'll probably get it just right!
Getting filled...
And just out of the oven. I may have left them in just a couple of minutes too long--the crusts were a little darker than I like, but not at all burnt. Still tasty, though!
You can see on the edge of this one where the filling bubbled over a little and made the crust stick.
Use a really sharp, thin knife (I used one of my PC paring knives) to loosen the edges where the pies are sticking. You don't want to bust up the crust, so a thin blade is best.
Use a spoon to help you lift the pies out of the muffin tins and place on the cooling racks. Look at those yummy pies!
Mini Apple Pies
Ingredients:
8 cups apples, diced into 1/2 inch cubes
12 Tbsp flour
1 1/2 cups sugar
4 heaping tsp cinnamon
1/4-1/2 tsp nutmeg
4 Tbsp butter, cut into 24 equal portions
2 boxes refrigerated pie crust (4 crusts)
Directions:
1. Mix together flour, sugar, cinnamon, and nutmeg. Toss over diced apples and mix to coat evenly.
2. Cut out 24 circles of dough and line your muffin cups, saving all scraps.
3. Fill each muffin cup with apple mixture and place one piece of butter on top of apples.
4. Roll out remaining pie crust scraps and cut 1/2 inch wide strips to form lattice tops. 3 strips in each direction should cover it. Tuck in the ends so they don't overhang.
5. Bake pies at 400*F for 18-22 minutes.
I mixed up all my dry ingredients as soon as the pumpkin pies went into the oven.
I used an apple slicer on all my apples first. I used 3 Granny Smith apples and 3 Honeycrisp apples.
My sweet husband helped me to peel the apples with a paring knife, then we chopped them into tiny pieces.
All chopped up! There's some variety in the size of pieces, but I think that works well to fill the pies.
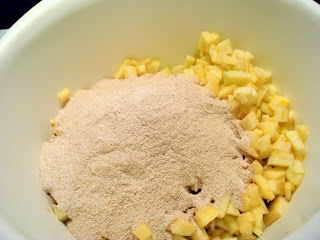
Add in the dry ingredients and mix it up well. I dug in with my hands to make sure there were no dry bits hiding at the bottom.
Getting started on the lattice tops--you can see the butter pieces, too. I forgot these the first time I made the pies and I do think it helps to keep the insides nice and juicy. We used a decorative cutter to slice our lattice pieces.
So pretty!
My sweet husband helped with the lattices.
Look at him go!
One whole pan covered in the lattices.
We ran out of dough and the last two got skimped on... those were our samples after the pies came out of the oven!
Look at them all golden brown and delicious!
A few of them were a little TOO juicy and bubbled over a bit, oops! Just use the paring knife again to loosen the pies where they got stuck.
And here they are cooling down. Notice there are a couple missing? They sure were tasty!
And there you have it! 2 different kinds of miniature pies for your eating pleasure. :)


